Friday, June 27, 2014

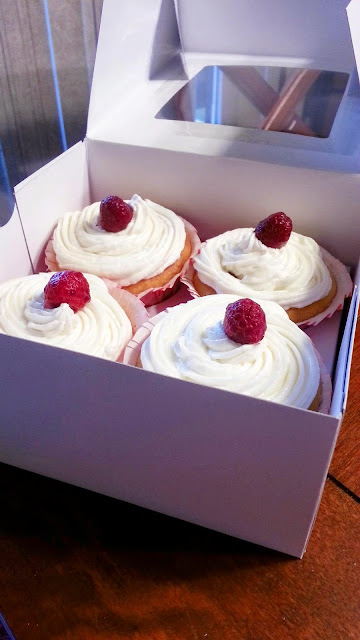
Gluten Free Cupcakes with Raspberry Filling

My best friend just got married this last weekend and I have the worst time watching people eat desserts or cheesecurds when I can’t have them. I received the guest list and saw that there was going to be a few of us that can’t have gluten so I decided to whip up some cupcakes! These freeze extremely well to keep on hand to bring with for events like this or even school events for children.

I used Solo Raspberry Cake & Pastry Filling (which verified as gluten free from their website: http://www.solofoods.com/gluten-free) since I didn’t really have time for making the filling homemade.


Gluten Free Vanilla Cupcakes with Raspberry Filling

Ingredients

¼ cup softened butter

¾ cup granulated white sugar

2 eggs, lightly beaten

1 Tablespoon pure vanilla extract

1½ cups Gluten Free Flour (I used Domata Living Flour)

2 teaspoons baking powder

¼ teaspoon salt

½ cup milk


Instructions

-Preheat oven to 350 degrees.
-Line a muffin tin with 12 paper muffin liners
-In a mixing bowl, combine butter and sugar and beat until smooth
-Add in the eggs and vanilla
-In a separate bowl, whisk flour, baking powder and salt.
-Add half of flour mixture to the mixing bowl
-Pour in milk and then add remaining flour
-Stir until batter is smooth
-Spoon batter muffin tin
-Bake 12-15 minutes until cooked through and light golden brown on top
-Remove from oven to cool

Adding in the Raspberry Filling

-Once cupcakes are cool you can begin adding in the filling
-Take a butter knife and create an X on the center of each cupcake, without going all the way down to the bottom of the cupcake.
-Place raspberry filling inside of a piping bag with a large round piping tip
-Place the tip inside the cupcake and squeeze the filling in until it reaches the top
-Once you have finished all of them, you can pipe on the buttercream frosting.

Buttercream

I always use 1 cup unsalted butter, ½ cup milk, ¼ tsp salt, 2 tsp vanilla extra, and 2 pounds of powdered sugar in a mixing bowl. You can adjust as needed for thicker or thinner icing for the cupcakes.

 
Enjoy!

Sunday, June 15, 2014

Couples Swept Away Negril, Jamaica


It has been really busy since our relaxing vacation and I really wanted to review our vacation at Couples Swept Away in Negril, Jamaica for everyone! Here goes!


The ride from the airport to the resort was an hour and a half which seemed really long. 

The resort itself was beautiful and Seven Mile Beach was probably the best I have seen, the water was incredibly clear.


When we arrived, they upgraded our room from the Garden Verandah Room to an Atrium Suite room. I was very glad they did! The room was conveniently located near The Palms Restaurant where they had nightly entertainment but yet it made it seem as if we were in the middle of a forrest with no one around because of all the trees and greenery around the room. We had a patio outside the room with a hammock and couch. No tv, which I thought was great to be away from anyway! There was a fully stocked mini-bar in the room with a checklist of options to switch it all out for whatever your favorites are.


The weather cooperated a lot better than it looked like it was going to. It looked like it was going to rain all day, every day, when I looked at the weather before we left. It ended up raining most of the days but it was around 12:00-1:00 for only about an hour so it worked great to get a nice nap in!


The food was good. Most places (not all) had the chef come out and go over the menu with me. They all seemed to be knowledgeable about gluten free to an extent. There was a few times that they said something was gluten free (couscous or something fried) and I had to explain that it was not for someone with celiac. They had a lot of meats, fruits, and vegetables though, that I never went hungry. One chef at Patois Patio was amazing. He came out and told me that if I came for breakfast the next morning, I could choose anything off the menu because he would order gluten free bread for me. The next morning I came back and ordered the Banana Stuffed French Toast. I was in heaven. Feathers Restaurant and Lemon Grass required reservations and they were decent but i didn't understand why we had to go to the front desk to reserve spots (only 1 day in advance can you do reservations for ANYTHING).


We did the Glass Bottom Boat Tour and the Catamaran Cruise. I had to stand in line starting at 7:00 in the morning in order to get in a decent spot in line for the 8:00 opening to sign up for the Glass Bottom. I found this whole reservation thing to be ridiculous. It really takes away from the relaxing when you have to be standing in line to sign up to do the activities offered. When we arrived at the resort we signed up for the Catamaran Cruise right away because it was fully booked until our last night there (not a good night to be on a booze cruise when we had to be up in the morning to ride a plane- didn't go over so well for the hubby). We would have loved to do the Catamaran Cruise (this was definitely our favorite) more than once but there was nothing available and our reservations we had before we left must not have went through correctly because they had nothing listed for us. I think the reservation part of this resort was unfortunately it's downfall. I don't think we would go back here again because of that and the public beach with all of the vendors constantly hassling people to buy things.


We did not meet up at the particular times to do the initial orientation meeting. So we didn't know the nightclub area and some of the other things even existed until the last couple nights. We definitely could have enjoyed ourselves more if we did the orientation.


All in all we did have a great trip though! It was some much needed alone time with my hubby!


Monday, June 9, 2014

Elsa from Frozen Doll Cake (gluten free)

For my daughter's birthday, I decided to try out making a "doll cake" or "Barbie cake." I don't have one of the cake pans in the shape of a dress but I do have a batter bowl that fit the shape of a dress quite well. I apologize now that this post looks incredibly long but I wanted to give you exact details on all the different parts of doing a cake! Here goes....

Two days ahead of time, I made the Meringue snowflakes for the dress. They need about 24 hours to sit as they are extremely fragile! I would suggest making double of what you think you will need as many of mine broke when I applied them to the cake. I found a pattern of a snowflake that I thought would work and printed it out and placed it underneath wax paper. I piped it using a #2 size tip with the recipe as follows:

Snowflake Meringues

2 tbsp. meringue powder

2 cups powdered sugar

3 tbsp warm water (can add more if needed)

Mix together in mixing bowl until stiff peaks form. Add water if the consistency is not correct. It should be thick enough that it will not be runny when doing the piping.

Using a #2 size tip, outline your snowflakes with the icing. Try to add a couple layers so they don't break apart as easily.

With the extra icing I had, I shaped some icicles for decorations on the cake and with the "ice caps" I made out of blue jello.

One day ahead of time I made the cakes. The height of one batter bowl cake (2 boxes cake mix minus about 3 cups worth so it doesn't overflow) wasn't tall enough so I also did another cake in an angel food cake pan. This allowed more height on the outside rather than the center of the cake where the doll was going. You can make the cakes a day or two ahead of time so that they are cool when applying the buttercream and fondant to them- this makes things much easier.

When you are ready to assemble your cake, you need to level the cakes with a leveler or serrated knife so that your cake won't be wobbly.

Next, I made the buttercream: 1 cup unsalted butter, about 1/2 cup milk, 1/4 tsp salt, 2 tsp vanilla extract, and 2 pounds of powdered sugar in a mixing bowl.

Then spread a thin layer of buttercream on the bottom of a cake board. This helps to "glue" the cake to the board so it's easier to decorate. I used my angel food shaped cake as the bottom layer. Apply more buttercream and then stack the batter bowl cake on top of that. Once it is shaped how you want it, you can apply the crumb coat.

I took out about 1 cup of the buttercream and put it in a smaller bowl and mixed in a couple tablespoons of water for the crumb coat. This is the "base" coat of icing that seals the crumbs so that in the next layer of icing, you have a smooth coat of the buttercream. I used a knife to lightly apply the crumb coat on the sides of the cake, then the top. Once your cake is covered, let the icing harden before applying the next coat. I put mine in the freezer about 20-30 minutes.

Next you apply the buttercream frosting. I used a spatula to apply and then a scraper to smooth the buttercream onto the cake. I let this harden for about 15 minutes and applied a second layer of the buttercream. This all works much easier if you have a turntable to help rotate the cake around!

For the next step, I made the fondant. I like my fondant to be marshmallow so people don't feel the need to peel off the fondant to eat the cake. The fondant can be just as enjoyable! Here's the recipe for the fondant:

Marshmallow Fondant

1 bag of mini marshmallows

2 pounds of powdered sugar

about 1/2 cup of Crisco

2-3 tbsp of water

Melt marshmallows and 2 tablespoons of water in a large, microwavable bowl for 1 minute. Stir and continue for another 30 seconds until the mix is completely melted.

Add in the powdered sugar and stir. I used Crisco at coat the counter top and my hands and started kneading the fondant until smooth. After about 5-10 minutes, I split off a small chunk of the fondant to leave to use for white small snowflakes and a snow pile for the candle to sit on. I added in blue food coloring to the rest of the fondant and kneaded it in.

Next I rolled it out using a large plastic fondant roller starting from the center each time and rolling outwards. Measure your cake from one side, over the top of your cake, to the other to see how far out you will need to roll the fondant out. Once it is the correct measurement, roll the fondant around the rolling pin. Starting from one side of the cake, roll the fondant out over the cake, to the other side. Trim off any excess edges you have.

Then you can shape the pleats on the dress. This will also help cover any imperfections your cake and buttercream have! Once you have the shape you like you can decorate with your snowflakes, candies, sprinkles, edible spray paint (I used Wilton Color Mist in blue for the dress bottom), or whatever else you want!

I used some of the cut off edging of the fondant and added more of the food coloring for a darker color fondant and cut them into the top of her dress for decoration. There are really so many different options for decorating these doll cakes that it makes it a lot of fun! Hope you enjoy!!

 

Thursday, June 5, 2014

Gluten Free Lemon Bars

To celebrate my daughter's birthday yesterday, because you have to have some sort of dessert on your birthday, I made Lemon Bars. We will be having her big birthday party on Saturday with cake so I wanted something that was light and refreshing for the beautiful day we had outside yesterday. This was something quick and easy to put together with ingredients I already had in the house. If you have fresh lemon, you could always add in grated lemon for more flavor! Enjoy!


Lemon Bars

Ingredients:

1 cup Bisquick Gluten Free mix
1/2 cup butter, softened
1/4 cup powdered sugar
1 cup sugar
4 tbsp. lemon juice
1/2 tsp. baking powder
1/4 tsp. salt
2 eggs
2 tbsp. butter, melted
Powdered sugar for sprinkling

Directions:

Heat oven to 350 degrees. Mix together Bisquick, 1/2 cup of butter, 1/4 cup powdered sugar in a bowl until blended together. I used my hands to make this process easier.

Press the mix into the bottom of an ungreased 8' square pan.

Bake 15 minutes or until lightly browned.

In a mixing bowl, mix sugar, lemon juice, baking powder, salt, and eggs on medium speed for 3 minutes or until light and fluffy. Add in melted butter.

Pour mix over the baked crust.

Bake an additional 15-20 minutes or until no indentation remains when lightly touched in the center. Cool completely and refrigerate about 2 hours.

Sift powdered sugar over top and enjoy!

Friday, May 2, 2014

Creamy Chicken Enchiladas

In celebration of Cinco de Mayo this weekend, I made these creamy little babies! I made a side of "Spanish Rice" by just making some brown rice and adding in some salsa, cumin, and chili powder. Much better than some of the boxes or bags of it you can get with all the added junk in it. Enjoy!

Creamy Chicken Enchiladas

Ingredients

corn tortillas (gluten free)

3 cups shredded cooked chicken  

1 clove minced garlic

1/4 tsp chili powder

1/4 tsp cumin 

1/2 tsp kosher salt

1/4 tsp black pepper 

1/2 cup diced green chili (4.5 oz can) 

8 oz cream cheese softened

1 juiced lime 

1 14 oz can green Chile enchilada sauce  

1/2-1 cup shredded pepper jack cheese

cilantro (optional)

Instructions

-Combine shredded chicken, cream cheese, garlic, chili powder, cumin, kosher salt, black pepper, lime and green chili in a medium sized bowl. Stir until combined.

-Place a little enchilada sauce on the bottom of a 9x13 dish and then put the tortillas in.

-Spoon 2-3 tbsp into each tortilla, roll it up, and place in the 9x13 dish.

-Pour the rest of the enchilada sauce over the tortillas and top with shredded cheese. Cover with foil.

-Bake at 350 for 15 minutes. Remove foil and bake for 10-15 more minutes, until the cheese is nice and bubbly. Allow to cool and enjoy! Top with fresh cilantro.


Thursday, May 1, 2014

Crock Pot Ham BBQ over Garlic Toast, Brussels Sprouts, and Potatoes

This is based off a recipe from my best friends' father. I always love when he makes this so I decided to throw it all in the crock pot one day and let the yummy aroma smell up the house!


Ingredients:

3-4 lbs of ham, cooked, diced in chunks
3 cups of ketchup
2 cups brown sugar
1/2 cup water
3/4 teaspoon mustard
1 tablespoon of vinegar (or cider vinegar)
1/2 teaspoon garlic salt
1/2 teaspoon of pepper
1 tablespoon Worcestershire sauce
1 tablespoon minced onion
1/2 teaspoon of liquid smoke flavoring

Directions:

-In a large saucepan, combine the ketchup, brown sugar, water, mustard, vinegar, Worcestershire sauce, and minced onion.
-Season with garlic salt, pepper, and liquid smoke.
-Cook on medium heat for a half hour, stirring occasionally.
-While that's cooking, shred up the ham.
-You can either throw the ham in the crock pot and cover with the sauce or put the ham with sauce in a roaster for about an hour. Either way, it turns out great!

Crock Pot Ham BBQ over Garlic Toast, Brussels Sprouts, and Potatoes


Recipe for how I make Brussel Sprouts can be found here: http://somelikeithotandglutenfree.blogspot.com/2014/04/meatloaf-mashed-potatoes-and-brussel.html


For the Potatoes:
I sliced them unpeeled at about 1/8 to 1/4 inch thickness. and put them in a mixing bowl. Drizzle with olive oil and your favorite seasonings, and salt & pepper. Bake at 425 degrees for 15-20 minutes!

For the Garlic Toast:
I combine softened butter with minced garlic and put butter on both sides of toast (I used Udi's Gluten Free White Bread). This is also really good topped with mozarella cheese but that didn't really go with this meal. Bake on a baking sheet about 10-15 minutes at 350 degrees. If using cheese, bake 10 minutes, add cheese, and bake 5 more minutes. Dried parsley spinkled on top would add a nice touch as well. 


Wednesday, April 30, 2014

Best Ever Banana Bread with Lemon Glaze (and of course it's gluten free too!)

This is banana bread that will put a smile on your face, is what this is. I know you will enjoy this because it turned out amazing! I doubled this recipe and make one large loaf and 12 muffins. This was so ridiculously good, I almost didn't want to share it. Until guilt set in and I decided it would just be wrong if someone out there didn't get to taste this sweet deliciousness! So here you go! 


Banana Bread with Lemon Glaze
 
Ingredients

1 1/4 cups Domata Living Flour (http://www.domatalivingflour.com/)
2 tsp baking powder
1 1/2 tsp cinnamon
1/2 tsp salt
2 large eggs (room temp)
1 cup sugar
3 mashed bananas
2 tsp vanilla extract
1/2 cup vegetable oil
Directions

-Preheat oven to 350 degrees.
-Grease a loaf pan with nonstick cooking spray.
-In a large bowl mix together flour, baking powder, cinnamon, and salt.
-In another bowl, whisk together the eggs, sugar, bananas, vanilla, and oil.
-Stir wet ingredients into the flour mixture.
-Pour batter into pan.
-Bake about 50 minutes.
-Let cool while you mix up the glaze. 
 
Lemon Glaze
Mix together 4 tablespoons of sugar with 1 tablespoon lemon juice. You can adjust according to the flavor you like but we all happen to be fans of lemon in my house!


Enjoy!